Highlighting Text in Vim.
Published 07 August 2023 at Yours, Kewbish. 1,984 words. Subscribe via RSS.
Introduction
I’ve always liked text-based interfaces like TUIs and interactive CLIs. They’re consistent, familiar, and themeable (since they’re just text). I associate TUIs and text-based interfaces in general with a bit of an initial learning curve but also with a conceptual simplicity and most importantly, a lot of power. Interfaces like these are easy to make your own and to slip into.
Take Vim, for example. It’s infamous for its comparatively esoteric keybinds - how do you quit again? But once you take a moment to learn its modes and its keybind ‘vocabulary’, you’ll find that it’s predictable and dependable. I won’t go far as to say the keybinds are intuitive, but they can be reasonably added to your intuition model.
I started using Vim around 2020, when I was transfering all my notes from OneNote to Markdown. I was still in high school, so I had the liberty of not being as serious about my notes. I had grand ideals of being efficient and learning a new skill, and I’d heard about Vim from all the jokes online. It seemed like a fun challenge to learn. For a while, I used Vim bindings within VSCode, but when I switched to Linux in 2021, I made Vim my daily-driver editor.
I recently ported my configuration files over to NeoVim, since I’ve been seeing more and more plugins that rely on some NeoVim-specific features. Take the pets.nvim extension for example. Most plugins also limit support to NeoVim for some nice QOL features. COC.nvim type annotations display better and don’t break on NeoVim, and the spelling plugin I use underlines better. Most of my config has stayed the same - it’s been a super easy port, and that says a lot about the level of care to maintain Vim interop.
I’ve also started adding more personal touches to my notetaking Vim config. I thought it’d be cool to add some color to my setup, which is currently extremely grey, and added some snippets for colouring text in my notes. I’ve always wondered if it’d be possible to replicate the OneNote / typical word processor features of highlighting. I’ve thought about replicating the ease of use of text colouring in OneNote via a visual selection → highlight mechanism in Vim, and I’ve just lately figured out how to do it.
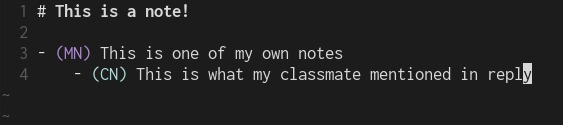
Figure 1. My current highlighting setup.
This is a post about implementing a reasonably usable text highlighting feature in Vim, and the other fun Vim features I discovered along the way.
Snippet Expansions
There are loads of Vim plugins for inserting snippets, like vim-snippets or Ultisnips. However, for the simple text highlighting that I use in my notes, I’ve found it easier to just use insert mode level remappings natively in Vim.
For my insert mode remaps, I tend to map combinations starting with my leader key, </kbd>. Starting combos with your leader avoids the situation where you really do want to type a sequence of keys instead of execute your keymap. My leader key’s not something that I’d typically type in writing, so the short delay Vim imposes when I want to type the single character is bearable.
Here’s the basic form of one of my native snippet expansions:
inoremap <leader>[shortcut] [text to insert]
i-denotes that it’s a remapping that only applies in insert mode.-no-denotes that we shouldn’t substitute any of the following characters for remapped versions, effectively making it non-recursive. For example, if we’d defined ’s’ elsewhere to insert ‘ß’ in insert mode, adding-no-makes the remap insert ’s’ if the remap itself contains ’s’.-remapdenotes the remap.- The second bit here is the keymap to press. I use my leader key (
\) followed by a quick shortcut. - The third part is the text to insert.
For example, to insert (CN) in a note, I use the following keybind.
inoremap <leader>cn (CN)
I only make a snippet mapping when I find myself having to repeatedly type long or physically awkward phrases. These types of snippets are useful for movements that would otherwise require shifting and wrapping and generally more finger movement than desired. Instead of holding shift and pressing 9-c-n, I can just tap leader-c-n1.
Text Styling
Onto the fun part - text styling. In Vim, you can recreate text highlights (changing the background colour of text), font colour changes (changing the foreground colour of text), bolding, italicizing, underlining, and striking through text. There’s probably more to this list - there are a lot of terminal escape sequences.
To do this, you can add autogroups in your .vimrc or init.vim. If you want, you can also create your own Vim plugin to keep things organized, and so you can more easily distribute your updates.
Here’s a basic skeleton for how to change the colour of text:
augroup notes
    autocmd!
    autocmd FileType markdown syntax match CorrodeClassmateNote /\v\(CN\)/
    autocmd FileType markdown hi CorrodeClassmateNote ctermfg=152 guifg=#afd7d7
augroup END
This renders to:

Figure 2. An example of highlighting (CN) in light blue.
The first autocmd line creates a syntax match ‘class’, and the second autocmd highlights the text. The syntax match class is a regex - you can use the \v escape option to avoid escaping all the regex special characters manually. Here, I’m matching the literal (CN)2.
Each match can be added to a group (CorrodeClassmateNote is a match group, for example), and the name of the match group is the identifier you’ll use to style it. Avoid using common group names so you don’t override your existing theme. The FileType markdown also makes this match group only apply in Markdown files, though you can use filename globs or choose another Vim filetype.
The second line highlights the CorrodeClassmateNote group with the given ctermfg (foreground colour used in the terminal) or guifg (colour used if you use GUI Vim instead). guifg can be in hex, but ctermfg needs to be one of the Xterm prompt colours supported by your terminal.
You can change ctermfg and guifg to ctermbg and guibg respectively to change the background colour used in the terminal or GUI. This gets you a typical ‘highlighter’ functionality.
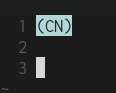
Figure 3. Highlighting (CN)’s background in light blue.
If you want to bold or italicize text, just add cterm=bold gui=bold or cterm=italic gui=italic to the end of the hi autocmd. And if you’d like to apply both, cterm=bold,italic gui=bold,italic will do the trick. See :help attr-list for more information on the attributes you can use to style text here.
Ctrl-Shift-C (or, Changing Font Colour)
If you want to colour not just specific text, but replicate a general ‘change colour’ functionality in Vim, define a match group like so:
autocmd FileType markdown syntax match GreenHighlight /\v\(\#G(.*)\)/
autocmd FileType markdown hi GreenHighlight ctermfg=121 guifg=#88ff88
This highlights all matches of (#G text) a special shade of green. In Vim, it renders to this:

Figure 4. Highlighting some text in WebWork green.
You can define multiple match groups with different prefixes - say, (#Y text) for yellow instead of green - for whatever you want to use. You can also define a remap in visual mode to wrap the current selection with the appropriate syntax to highlight it:
vnoremap <leader>hg c(#G <C-r>")<C-c>
Select some text in visual mode, then hit <leader>hg to add the highlighting markup. This makes use of vim’s default register with the ‘c’ command to replace text selected in visual mode with the wrapper (#G ... ), and uses <C-r>" (Ctrl-r) to paste the contents that you just selected back into the wrapper. The final <C-c> exits insert mode for you for convenience.
The issue with this approach is that you’ll have to add markup to your text to get it to highlight. While it’ll still be there in the raw file contents, let’s address the visual aspect and hide the (#G ... ) wrapper in-editor.
A Cleaner Look with conceal
This’ll make use of Vim’s conceal feature. It leverages match groups, similarly to text highlighting, to hide text that matches some pattern until you move your cursor to that line. People typically use this to replace syntax with more aesthetically pleasing characters, like replacing lambda x: with λ x:. It can also be used to hide comments that aren’t distracting, make inline flashcards that only preview when you hover on a line, and prettifies Markdown markup and Zotcite citations.
To hide the highlighting wrapper markup:
autocmd FileType markdown syntax match GreenHLConceal /\v(\(\#G\s)/ conceal
autocmd FileType markdown syntax match GreenHLConceal /\v(\(\#G\s(.*))@<=\)/ conceal
autocmd FileType markdown syntax match GreenHighlight /\v(\(\#G\s)@<=([^\)]*)\)@=/
autocmd FileType markdown setlocal conceallevel=3
The first syntax match line matches the first part of the wrapper, (#G, and the second uses Vim’s lookback syntax to match any ) preceded by a (#G. The GreenHighlight line has been extended a bit to deal with multiple markups per line too.
The fourth line sets the file’s concealllevel to 3. Concealled groups have ’levels’ of display, which can be controlled on a buffer-level basis. The default conceallevel=0 means that all concealled text is still shown in-editor. conceallevel=3, what we’re using, means that all concealled text is completely hidden until you move your cursor to that line. In between, conceallevel 1 and 2 can also display a single character replacement for the hidden text. For example, you can add cchar=🟩 to the first syntax match to replace the concealled text (the (#G) with a green square emoji.
If you’re adding multiple highlighting syntax matches, you can hide all their markup prefixes in one command by replacing the G in each of the first three syntax match lines to something like [RGB]. This will hide the markup for all (#G ...), (#B ...), and (#R ...) highlight groups.
This renders to this:

Figure 5. Hiding the highlighting markup on cursor move.
Conclusion
These highlighting features have helped me keep track of class discussions more easily and make my terminal-based notetaking system a little more fun. I only have two of these highlighting shortcuts set up (for “my notes” and “classmate’s note”), but I use them fairly frequently during classes.
There are probably plugins to automate the creation of snippets and of highlighting commands, but I don’t create new highlighting groups often enough to make it worth understanding them. Vim is known for its steep learning curve and batteries-not-included approach: I think the fact that the ‘proper’ approach to this custom highlighting is a couple of plugins or quite a few lines of Vimscript is a testament to that. But I think learning to make custom highlighting groups and learning a bit more about Vim’s syntax matching is a great way to get started with Vimscript. For those with a bit of regex knowledge, the syntax is relatively clear and the autocmds are a starting point for adding plenty of custom behaviour.
Another feature I’d like to explore now since I’m using NeoVim is virtual text, officially known as extmarks. I first learned about this when the GitHub Copilot Vim plugin came out and I realized it wouldn’t work with vanilla Vim3. While Vim 9 supports this feature, there were a good few other reasons to switch to NeoVim, so I never tried it out in vanilla Vim.
I’d like to continue to explore more Vim quirks on this blog - it’s amusing to see how far I can push things. For a while, I tried to replicate a basic flashcard system in Vim, and I also have a couple updates to my FZF + RG setup, specifically for for development. Recently, I even saw an interesting CTF challenge written in Vim. I’ve been thinking of covering these, perhaps in a shorter format, but we’ll see when I’ll get around to it.